¶ Overview
ViciDial can use Caller ID (CID) Groups when placing outbound calls on a campaign to rotate the outbound number being used with each call. Depending on the configured mode of the CID Group, it can either cycle through each number in sequence, cycle based on time, or by matching the lead's area code or state. Multiple CID Groups can be configured in the system at once for ease of switching between them when necessary.
¶ Types of CID Groups
There are three possible types of CID Groups, which are AREACODE, STATE, and NONE. They function as follows.
- AREACODE: This method will look for a CID number that matches the area code of the lead being dialed. If there are multiple defined CIDs for one area code, the system will cycle through them in order with each call made. If no matching CID is found, the system will use either the default Campaign Caller ID, or a CID Group Failover, if configured.
- STATE: This method works similar to the AREACODE method, except it will search the CID Description for the state defined in the lead. Note that this does not look at the state the area code of a particular CID number belongs to, but will instead look at the CID Description for each defined CID number to determine if it's a match. No or multiple matches are handled the same way as an AREACODE group.
- NONE: This method performs no matching on the lead's area code or state, and instead is used only to rotate through the list of numbers in sequence.
¶ Managing CID Groups
You must be a User Level 9 admin to be able to manage CID Groups. There is no way to grant access to a level 8 admin without a code modification. CID Groups can be managed by logging into ViciDial Administration, then to Admin, then CID Groups on the left menu. A listing of all CID Groups will be displayed, along with their Group ID, Notes, Type, Admin User Group, and a Count of CIDs in the group.
¶ Add a CID Group
To add a CID Group, click the Add A CID Group link at the top of the CID Groups page. At a minimum, you must enter a CID Group ID, CID Group Type, and Admin User Group. You may optionally add CID Groups Notes for your reference about the purpose of the group. Click SUBMIT and you will be taken to the CID Group properties.
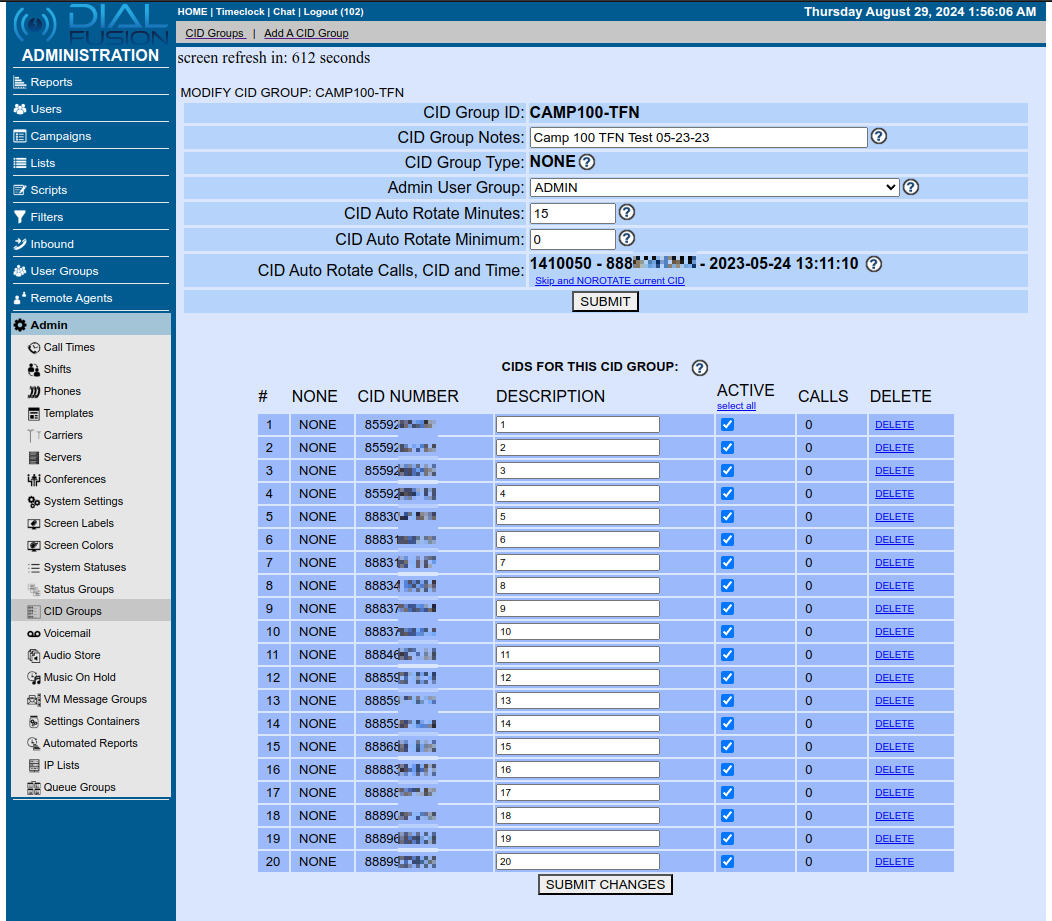
¶ Modify a CID Group
Select a CID Group from the CID Group Listing. Here you will be able to modify the CID Group Notes as well as the Admin User Group. If you need to modify the CID Group ID or the CID Group Type, you will need to create a new group as these options cannot be modified once the group is created. You will also see a listing of all CIDs inside the group. For all three types of groups, you will at a minimum see the row number, the CID Number, a Description, an Active checkbox, a count of Calls made from that number today, and the option to delete that number. For AREACODE type groups, the Description field will contain the two letter state code for the area code. This field is not used when determining which number to use to call a lead, instead the Areacode column will determine that. For STATE type groups, the Description field will also contain a two letter state code, but this is the actual lead state the system will search for when finding a number to use to dial a lead.
¶ NONE-type Groups
NONE type groups are special in that they contain two additional settings fields, as well as an additional status line. The Description field also has special behavior in these groups. The two additional settings are CID Auto Rotate Minutes, and CID Auto Rotate Minimum. The Minutes setting controls how often the system should cycle to the next CID in the group. If this is set to 0, the system will rotate the CID with every call placed. If set to anything other than 0, the system will place calls from a single CID until the Minutes value has been reached. It will then rotate to the next CID in the list. The Minimum setting allows you to require a minimum number of calls to be placed from the active CID number before it is rotated. This offers additional flexibility where the system will only rotate the CID when both the required Minutes, AND the required Minimum number of calls has been reached. You may configure the Minutes setting without configuring the Minimum, but you may not configure the Minimum without also configuring the Minutes.
An additional status line, CID Auto Rotate Calls, CID and Time will also appear when viewing the details of a group. This will show you how many calls have been placed from the current CID, what the CID is, and the last actual time the CID was rotated. This updates in real-time (with each page refresh) as the system places outbound calls. If the Minutes setting is set to 0, you will only see a count of calls placed from the CID group, and the Time will show a default 2020-01-01 00:00:01. If Minutes is non-zero, you will see the currently active CID as well as the actual last time it was rotated. An additional link will also appear, which says Skip and NOROTATE current CID. This will cause the system to immediately rotate to the next CID in the group, and will prevent this CID from being selected again during rotation.
¶ Load Numbers to a Group
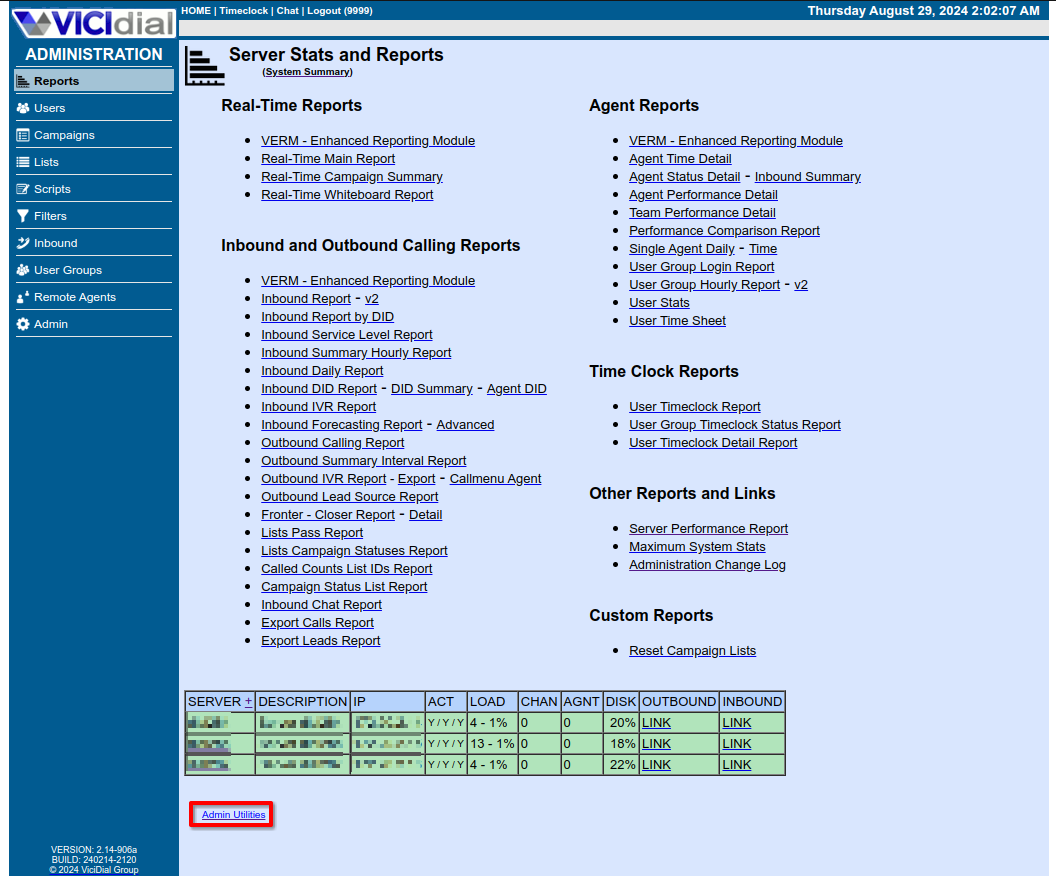
To load numbers to a CID Group, click Reports on the left-side menu, then click the small Admin Utilities link below the server info.
Select Admin Bulk Tools. Scroll down to the CID Groups and AC-CID Bulk Add section. Select a fill Method. STATE LOOKUP is the default, and will use the CID's area code to determine the state to place in the CID description. CSV allows you to provide a CSV list of area codes, CID numbers, descriptions, and active status. STATE FILL works similar to LOOKUP, except it will then look up all area codes for the matched state, and insert a CID for each matching area code using the entered CID. For example, if given the CID 7271234567, 19 CID entries will be created with the same CID, one each for every area code in Florida. You should not use the STATE FILL method when inserting into a STATE type CID group. Select a Campaign or CID Group to load the numbers into. Select whether or not you want the newly inserted numbers to be Active in the group. In most cases, you should select Yes. Input only works when using the CSV load method. Finally, enter each CID number on its own line in the CID Group and AC-CID entries section. Click Submit. The system will validate that there are no duplicate numbers in the selected group, and that all provided CIDs are valid. Scroll to the bottom and click SUBMIT an additional time.
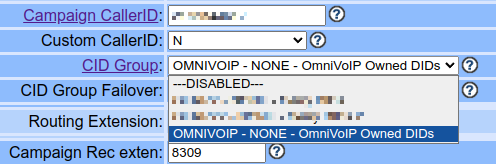
¶ Activating a CID Group
Once a CID group has been added and loaded with numbers, it must be activated in a campaign to begin using it. Start by navigating to Campaigns, selecting the Campaign ID, then going to the Detail View (top of the screen). Scroll down to the CID Group setting in the campaign, and select the newly created CID Group. Optionally, you can select a CID Group Failover which will be used when the primary CID Group does not have a matching number for the lead. When using two different types of CID Groups, this can create a powerful combination of local numbers that can help you get answers! For example, using an AREACODE primary group with a STATE Failover, the system will first try to find a CID number matching the area code of the lead you're calling. If no match is found, the system will then fall back to a CID number that is still in the same state as the lead. Or, use an AREACODE and a small, NONE type group of a few Toll-Free numbers to avoid burning out a single number in instances where an area code match isn't available. These are just a few of the possible combinations possible with failover settings. Scroll to the bottom of the page and click SUBMIT. The changes will take effect immediately, agents do not need to log out and back in.